> ## Documentation Index
> Fetch the complete documentation index at: https://docs.generalrobotics.dev/llms.txt
> Use this file to discover all available pages before exploring further.
# Build a mission in the UI
> Open the editor, choose a map, place waypoints, plan a route, and save it for Python.
The mission editor lets you author a route without connecting to a robot.
You choose places on a map, inspect the planned route, and save it to GRID cloud.
Then [run that saved mission through GRID CLI](/navigation/first-mission).
## 1. Open the editor
Use the GRID CLI with your account signed in and the intended cluster selected:
```bash theme={null}
grid nav start
```
Already in the GRID interactive shell? Run `nav start`. To print the URL
without opening a browser automatically:
```bash theme={null}
grid nav start --no-open
```
Open the exact `http://127.0.0.1:PORT/navigation?session=...` URL printed by
the CLI. Keep that process running. The page uses the CLI's existing login;
you do not paste a GRID cloud API key into it. Each page is pinned to the account
and cluster used when it opened. After switching either, open a new editor.
The mission editor authors maps and routes. The **Visualization** page
[observes a running robot](/cli/nav-telemetry). Saving or planning a
mission in the editor does not drive a robot.
## 2. Choose or build a map
Select a **COMPLETED** map in **Active map**. Use **Refresh** to fetch changes
and **Load more maps** when another page is available. A map still being
built, or a failed build, cannot be selected for planning.
If you have a scan from [GRID Navigator](/support/grid-navigator), expand
**Build a map**, enter a map name, select the **iPhone scan ZIP**, and choose
**Upload & build**. The ZIP must be nonempty and at most 4 GiB. Keep the page
open until upload and submission finish. The editor then polls build progress;
closing the page after submission does not cancel the cloud build. Refresh
the list and select the map once it is completed.
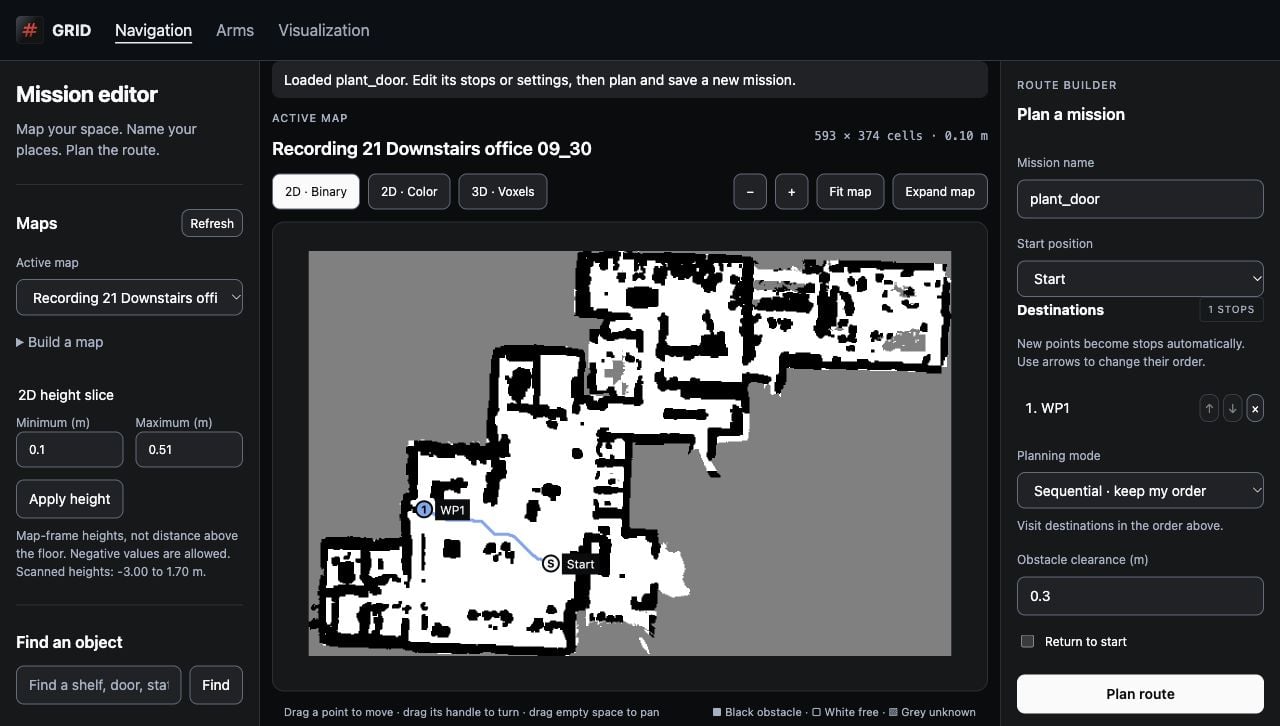
The screenshot below uses an existing office map and its saved `plant_door`
mission. Your map, names, and coordinates will differ.
 ### Understand the map before placing points
In **2D · Binary**, black is obstacle, white is observed free space, and grey
is unknown. Use **2D · Color** for captured color or **3D · Voxels** to inspect
the volume. Place waypoints in a 2D view. Drag empty space to pan, scroll to
zoom, and use **Fit map** to recover the full map. **Expand map** hides the
side panels. In 3D, drag to orbit, right-drag to pan, and scroll to zoom.
**2D height slice** selects the minimum and maximum heights used to build the
occupancy view. Values are metres in the **map frame**, not distance above
the floor; negative values can be correct. Enter a range within the scanned
height extent and select **Apply height**. Pick a slice that captures the
obstacles relevant to your robot. Changing it invalidates the route preview:
check the waypoints and plan again. If a slice is empty, adjust its limits.
## 3. Place and name waypoints
Click observed free space. The **Name this place** dialog opens with an
automatic name such as `wp_1`. Give it a useful unique name, inspect **Map X**
and **Map Y** in metres, and choose **Apply waypoint**.
The first point becomes the start. Later points become destinations.
**Add** opens the same dialog when you want to type known coordinates rather
than click. Enter verified coordinates: the initial numeric values are not
a recommendation for where to navigate.
### Understand the map before placing points
In **2D · Binary**, black is obstacle, white is observed free space, and grey
is unknown. Use **2D · Color** for captured color or **3D · Voxels** to inspect
the volume. Place waypoints in a 2D view. Drag empty space to pan, scroll to
zoom, and use **Fit map** to recover the full map. **Expand map** hides the
side panels. In 3D, drag to orbit, right-drag to pan, and scroll to zoom.
**2D height slice** selects the minimum and maximum heights used to build the
occupancy view. Values are metres in the **map frame**, not distance above
the floor; negative values can be correct. Enter a range within the scanned
height extent and select **Apply height**. Pick a slice that captures the
obstacles relevant to your robot. Changing it invalidates the route preview:
check the waypoints and plan again. If a slice is empty, adjust its limits.
## 3. Place and name waypoints
Click observed free space. The **Name this place** dialog opens with an
automatic name such as `wp_1`. Give it a useful unique name, inspect **Map X**
and **Map Y** in metres, and choose **Apply waypoint**.
The first point becomes the start. Later points become destinations.
**Add** opens the same dialog when you want to type known coordinates rather
than click. Enter verified coordinates: the initial numeric values are not
a recommendation for where to navigate.
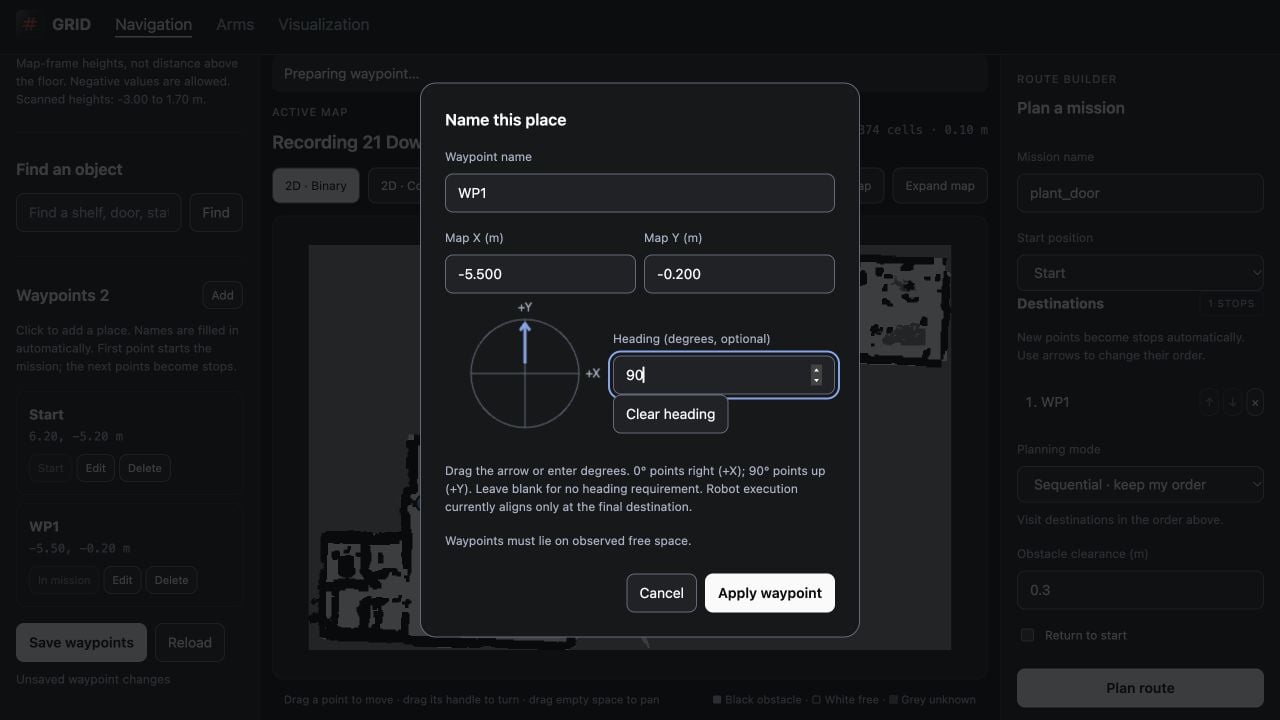 A heading is optional. Type degrees or drag the direction dial:
**0° points along +X; 90° points along +Y**. Blank means no heading requirement;
zero is an explicit direction. **Clear heading** removes it. The current
robot executor aligns to a heading at the **final destination only**.
To adjust a waypoint, drag its marker, drag its heading handle, or use **Edit**
for exact values. Names must be unique, at most 200 characters, and cannot
contain angle brackets or a null character. Keep every waypoint on observed
free space.
### Save the place library
**Save waypoints** stores the named waypoint library on this computer, scoped
to the CLI account, cluster, and map. **Reload** restores the last saved
library and clears the current route. Unsaved changes trigger a warning; if
another tab saved first, reload before editing again.
This local save does not create a GRID cloud mission. Local names are not
semantic labels searchable through `nav.find()`, and there is no remote
`nav.list_waypoints()` method. Saved GRID cloud missions may label their stops
`WP1`, `WP2`, and so on when loaded; local names remain in the local library.
## 4. Find a mapped object instead of choosing XY
Under **Find an object**, enter a description such as “door” and select
**Find**. Review the returned matches and suggestions, then select the object
you intend. This searches the stored map, not a live camera image.
The orange marker is the object. With a start position selected, the editor
can plan a reachable **approach waypoint**, shown in green, near that object.
Inspect it in the waypoint dialog before applying it; **Face object** sets
a heading toward the object. If no start is set, a free-space object can be
added directly. Otherwise choose a start and use **Generate approach waypoint**.
An object can be inside an obstacle or unreachable from the chosen start.
An object's location and the robot's approach location are different things.
Use **Clear results** when finished with the search.
## 5. Build and preview the route
In **Plan a mission**, enter a name and choose **Start position**.
Use **Use in mission** beside an existing waypoint to add it to **Destinations**.
The remove button removes a stop from this route; **Delete** in the waypoint
library removes the waypoint itself.
| Setting | What it changes |
| - | - |
| **Sequential · keep my order** | Visits destinations in the displayed order. Move stops up or down with the arrows. |
| **Optimal · optimize visit order** | Uses route-order optimization (nearest neighbor and 2-opt). Inspect the preview for the actual visit order; the label does not guarantee a mathematical optimum. |
| **Obstacle clearance (m)** | Cloud planner clearance, from 0 to 10 metres; initial value 0.3. This is separate from robot speed, footprint, and live collision settings. |
| **Return to start** | Adds a return leg to the selected start. |
Choose **Plan route**. Review the line through free space, route length,
destination count, and any green rings showing relocated destinations.
Edits to waypoints, route settings, or the height slice require another plan.
## 6. Save the mission to GRID cloud
After planning, choose **Save mission to Cortex**. This is the save that makes
a route available to `nav.list_paths(map_id)` and `nav.run_mission(path_id)`.
A plan preview alone is not a saved mission.
A heading is optional. Type degrees or drag the direction dial:
**0° points along +X; 90° points along +Y**. Blank means no heading requirement;
zero is an explicit direction. **Clear heading** removes it. The current
robot executor aligns to a heading at the **final destination only**.
To adjust a waypoint, drag its marker, drag its heading handle, or use **Edit**
for exact values. Names must be unique, at most 200 characters, and cannot
contain angle brackets or a null character. Keep every waypoint on observed
free space.
### Save the place library
**Save waypoints** stores the named waypoint library on this computer, scoped
to the CLI account, cluster, and map. **Reload** restores the last saved
library and clears the current route. Unsaved changes trigger a warning; if
another tab saved first, reload before editing again.
This local save does not create a GRID cloud mission. Local names are not
semantic labels searchable through `nav.find()`, and there is no remote
`nav.list_waypoints()` method. Saved GRID cloud missions may label their stops
`WP1`, `WP2`, and so on when loaded; local names remain in the local library.
## 4. Find a mapped object instead of choosing XY
Under **Find an object**, enter a description such as “door” and select
**Find**. Review the returned matches and suggestions, then select the object
you intend. This searches the stored map, not a live camera image.
The orange marker is the object. With a start position selected, the editor
can plan a reachable **approach waypoint**, shown in green, near that object.
Inspect it in the waypoint dialog before applying it; **Face object** sets
a heading toward the object. If no start is set, a free-space object can be
added directly. Otherwise choose a start and use **Generate approach waypoint**.
An object can be inside an obstacle or unreachable from the chosen start.
An object's location and the robot's approach location are different things.
Use **Clear results** when finished with the search.
## 5. Build and preview the route
In **Plan a mission**, enter a name and choose **Start position**.
Use **Use in mission** beside an existing waypoint to add it to **Destinations**.
The remove button removes a stop from this route; **Delete** in the waypoint
library removes the waypoint itself.
| Setting | What it changes |
| - | - |
| **Sequential · keep my order** | Visits destinations in the displayed order. Move stops up or down with the arrows. |
| **Optimal · optimize visit order** | Uses route-order optimization (nearest neighbor and 2-opt). Inspect the preview for the actual visit order; the label does not guarantee a mathematical optimum. |
| **Obstacle clearance (m)** | Cloud planner clearance, from 0 to 10 metres; initial value 0.3. This is separate from robot speed, footprint, and live collision settings. |
| **Return to start** | Adds a return leg to the selected start. |
Choose **Plan route**. Review the line through free space, route length,
destination count, and any green rings showing relocated destinations.
Edits to waypoints, route settings, or the height slice require another plan.
## 6. Save the mission to GRID cloud
After planning, choose **Save mission to Cortex**. This is the save that makes
a route available to `nav.list_paths(map_id)` and `nav.run_mission(path_id)`.
A plan preview alone is not a saved mission.
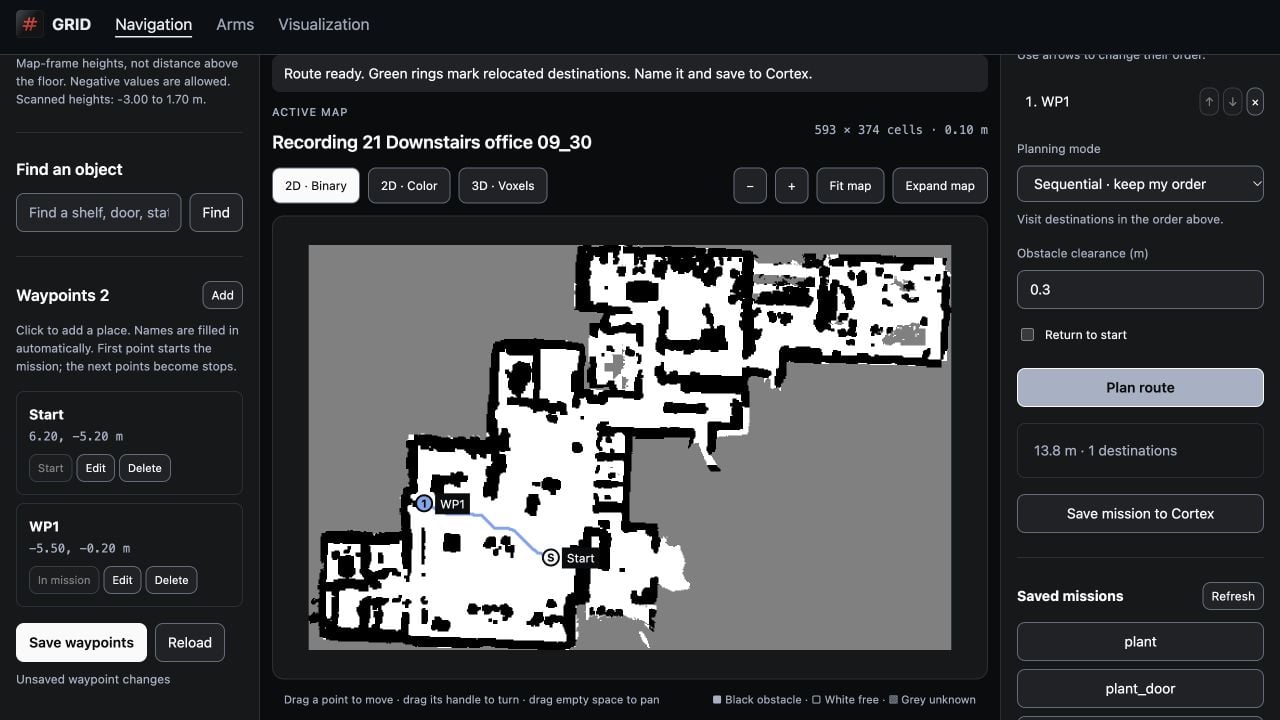 Check the success message and saved mission ID, then verify the mission appears
under **Saved missions**. The editor checks saved heading metadata too.
If it reports a saved mission with a verification warning, inspect the saved
entry before saving again. A lost response or failed list refresh does not
prove that the save failed; refresh the list first to avoid duplicates.
Selecting an entry under **Saved missions** loads its route, height slice, and
planning settings. It keeps the local library and adds any needed temporary
points. Editing, replanning, and saving creates a **new mission**, rather than
updating the original in place.
## 7. Run it from Python
Continue with [Run a saved mission](/navigation/first-mission).
Use the same map and the saved path ID. Place the physical robot at the
mission's intended start, start navigation, verify localization, and then run
the mission. The editor does not perform these robot-side steps for you.
## Related topics
- [Navigation through GRID CLI](/navigation/overview.md)
- [Chapter 1 — Run your first mission](/navigation/first-mission.md)
- [Chapter 2 — Plan your own routes](/navigation/planning.md)
- [Navigation data schemas](/navigation/data-types.md)
- [Navigation troubleshooting](/navigation/troubleshooting.md)
This documentation is built and hosted on [Mintlify](https://mintlify.com), a developer documentation platform.
Check the success message and saved mission ID, then verify the mission appears
under **Saved missions**. The editor checks saved heading metadata too.
If it reports a saved mission with a verification warning, inspect the saved
entry before saving again. A lost response or failed list refresh does not
prove that the save failed; refresh the list first to avoid duplicates.
Selecting an entry under **Saved missions** loads its route, height slice, and
planning settings. It keeps the local library and adds any needed temporary
points. Editing, replanning, and saving creates a **new mission**, rather than
updating the original in place.
## 7. Run it from Python
Continue with [Run a saved mission](/navigation/first-mission).
Use the same map and the saved path ID. Place the physical robot at the
mission's intended start, start navigation, verify localization, and then run
the mission. The editor does not perform these robot-side steps for you.
## Related topics
- [Navigation through GRID CLI](/navigation/overview.md)
- [Chapter 1 — Run your first mission](/navigation/first-mission.md)
- [Chapter 2 — Plan your own routes](/navigation/planning.md)
- [Navigation data schemas](/navigation/data-types.md)
- [Navigation troubleshooting](/navigation/troubleshooting.md)
This documentation is built and hosted on [Mintlify](https://mintlify.com), a developer documentation platform.